Articles with tag customization

Kiwi TCMS integration with 3rd party bug trackers supports the 1-click bug report feature. However you may want to change how the initial information is structured or even what exactly is written in the initial comment. This article shows how to do this.

The default text used for 1-click bug reports gets compiled based on information present in the TestExecution - Product, Version, TestCase.text, etc. This is encapsulated in the tcms.issuetracker.base.IssueTrackerType._report_comment() method. You may extend the existing bug tracker integration code with your own customizations. In this example I've extended the KiwiTCMS bug tracker implementation but you can provide your own from scratch

# filename: mymodule.py
class ExtendedBugTracker(KiwiTCMS):
    def _report_comment(self, execution):
        comment = super()._report_comment(execution)

        comment += "----- ADDITIONAL INFORMATION -----\n\n"
        #
        # fetch more info from other sources
        #
        comment += "----- END ADDITIONAL INFORMATION -----\n"
        return comment

Then override the EXTERNAL_BUG_TRACKERS setting to include your customizations:

EXTERNAL_BUG_TRACKERS.append('mymodule.ExtendedBugTracker')

and change the bug tracker type, via https://tcms.example.com/admin/testcases/bugsystem/, to mymodule.ExtendedBugTracker.

IMPORTANT

  • Information how to change settings can be found here
  • mymodule.py may live anywhere on the filesystem but Python must be able to import it
  • It is best to bundle all of your customizations into a Python package and pip3 install it into your customized docker image
  • API documentation for bug tracker integration can be found here
  • Rebuilding the docker image is outside the scope of this article. Have a look at this Dockerfile for inspiration

Happy testing!
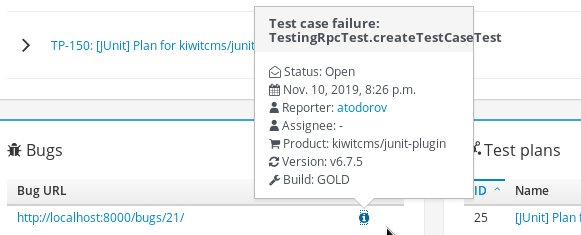
Starting with version 7.0 Kiwi TCMS pages displaying URLs to bugs also contain an info icon which shows additional information as tooltip. These are designed to provide more contextual information about the bug. By default the tooltip shows the OpenGraph metadata for that URL. This article will explain how to override this in 2 different ways.

bug details shown

Option #1: using the caching layer

Additional bug information is cached on the application layer. The cache key is the bug URL! By default Kiwi TCMS uses local-memory caching which isn't accessible for external processes but can be reconfigured very easily. This example changes the CACHES setting to use a directory on the file system like so

CACHES = {
    'default': {
        'BACKEND': 'django.core.cache.backends.filebased.FileBasedCache',
        'LOCATION': '/tmp/kiwi-cache',
        'TIMEOUT': 3600,
    }
}

Then you need to poll your 3rd party bug tracker (and/or other systems) and update the cache for each URL

from django.core.cache import cache
from tcms.core.contrib.linkreference.models import LinkReference

for reference in LinkReference.objects.filter(is_defect=True):
    # possibly filter objects coming only from your own bug tracker
    # in case there are multiple trackers in use

    # custom methods to grab more information. Must return strings
    title = fetch_title_from_bug_tracker(reference.url)
    description = fetch_description_from_bug_tracker(reference.url)

    # store the information in Kiwi TCMS cache
    cache.set(reference, {'title': title, 'description': description})

Then execute the Python script above regularly. For example use the following as your cron script

#!/bin/bash
export VIRTUAL_ENV=/venv
export PATH=/venv/bin:${PATH}
cat /path/to/cache_updater.py | /Kiwi/manage.py shell

bug details from customized cache

IMPORTANT

  • Kiwi TCMS expires cache entries after an hour. Either change the TIMEOUT setting shown above or run your script more frequently
  • How to modify default Kiwi TCMS settings is documented here
  • The Python + Bash scripts above don't need to be on the same system where Kiwi TCMS is hosted. However they need the same Python 3 virtualenv and cache settings as Kiwi TCMS does
  • Information about Django's cache framework and available backends can be found here
  • memcached is a supported cache backend option, see here
  • django-elasticache is a backend for Amazon ElastiCache which provides several configuration examples
  • Both django-redis and django-redis-cache are good libraries which support Redis
  • Any 3rd party libraries must be pip3 install-ed into your own docker image

Option #2: extend bug tracker integration

Let's say you are already running a customized Docker image of Kiwi TCMS. Then you may opt-in to extend the existing bug tracker integration code which provides the information shown in the tooltip. In this example I've extended the KiwiTCMS bug tracker implementation but you can even provide your own from scratch

class ExtendedBugTracker(KiwiTCMS):
    def details(self, url):
        result = super().details(url)

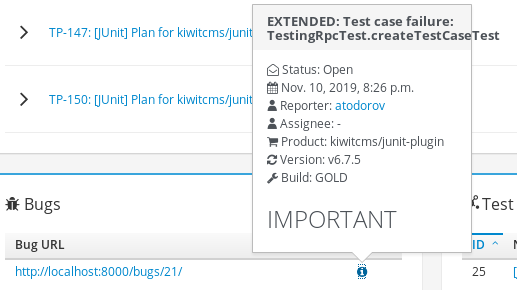
        result['title'] = 'EXTENDED: ' + result['title']
        result['description'] += '<h1>IMPORTANT</h1>'

        return result

Then import the new ExtendedBugTracker class inside tcms/issuetracker/types.py like so

index 9ad90ac..2c76621 100644
--- a/tcms/issuetracker/types.py
+++ b/tcms/issuetracker/types.py
@@ -17,6 +17,9 @@ from django.conf import settings

 from tcms.issuetracker.base import IssueTrackerType
 from tcms.issuetracker.kiwitcms import KiwiTCMS  # noqa
+from tcms.issuetracker.kiwitcms import ExtendedBugTracker

and change the bug tracker type, via https://tcms.example.com/admin/testcases/bugsystem/, to ExtendedBugTracker.

bug details extended internally

IMPORTANT

  • ExtendedBugTracker may live anywhere on the filesystem but Python must be able to import it
  • It is best to bundle all of your customizations into a Python package and pip3 install it into your customized docker image
  • ExtendedBugTracker must be imported into tcms/issuetracker/types.py in order for the admin interface and other functions to find it. You may also place the import at the bottom of tcms/issuetracker/types.py
  • API documentation for bug tracker integration can be found here
  • Rebuilding the docker image is outside the scope of this article. Have a look at this Dockerfile for inspiration

NOTE: starting with Kiwi TCMS v8.5 external bug tracker integration classes are listed in the EXTERNAL_BUG_TRACKERS setting. If you are using v8.5 or newer instead of importing ExtendedBugTracker in tcms/issuetracker/types.py you should override the list of available bug tracker integrations:

EXTERNAL_BUG_TRACKERS.append('mymodule.ExtendedBugTracker')

Happy testing!

In this blog post I will show more ways to customize Kiwi TCMS by adding logging capabilities to the API backend. Indeed this is a feature that our team deemed not required for upstream and was removed in PR #436.

Start by creating the following directory structure:

    api_logging/
        __init__.py
        handlers.py
        models.py

This is a small Django application that will log every call to the API backend. Each file looks like this:

    # models.py contains DB schema for your new table
    from django.db import models
    from django.conf import settings

    class ApiCallLog(models.Model):
        executed_at = models.DateTimeField(auto_now_add=True)
        user = models.ForeignKey(settings.AUTH_USER_MODEL, null=True, blank=True,
                                 on_delete=models.CASCADE)
        method = models.CharField(max_length=255)
        args = models.TextField(blank=True)

        def __str__(self):
            return "%s: %s" % (self.user, self.method)

Then

    # handlers.py overrides the RPC handlers coming from django-modernrpc
    from modernrpc import handlers

    from django.conf import settings
    from django.contrib.auth import get_user_model

    from .models import ApiCallLog

    def log_call(request, method_name, args):
        """ Log an RPC call to the database or stdout in DEBUG mode. """
        request_user = request.user
        if not request_user.is_authenticated:
            # create an anonymous user object for logging purposes
            request_user, _ = get_user_model().objects.get_or_create(
                username='Anonymous',
                is_active=False)

        if method_name is None:
            method_name = '--- method_name missing ---'

        if settings.DEBUG:
            print('API call:: user: {0}, method: {1}, args: {2}'.format(
                request_user,
                method_name,
                args))
        else:
            ApiCallLog.objects.create(
                user=request_user,
                method=method_name,
                args=str(args))

    class XMLRPCHandler(handlers.XMLRPCHandler):
        def process_request(self):
            encoding = self.request.encoding or 'utf-8'
            data = self.request.body.decode(encoding)
            params, method_name = self.loads(data)

            log_call(self.request, method_name, params)
            return super().process_request()

    class JSONRPCHandler(handlers.JSONRPCHandler):
        def process_single_request(self, payload):
            method_name = payload.get('method', None)
            params = payload.get('params')

            log_call(self.request, method_name, params)
            return super().process_single_request(payload)

NOTE: You will have to execute ./manage.py makemigrations api_logging to create the initial migration for Django. This could be easier if you place the above directory into existing Django application or craft the migration file by hand!

The last thing you want to do is create a local_settings.py file which will override Kiwi TCMS defaults:

    # local_settings.py
    from django.conf import settings

    settings.INSTALLED_APPS += [
        'api_logging',
    ]

    MODERNRPC_HANDLERS = ['api_logging.handlers.XMLRPCHandler',
                          'api_logging.handlers.JSONRPCHandler']

Then place everything in Dockerfile like so:

    FROM kiwitcms/kiwi

    COPY ./api_logging/ /venv/lib64/python3.6/site-packages/api_logging/
    COPY local_settings.py /venv/lib64/python3.6/site-packages/tcms/settings/

Kiwi TCMS will import your local_settings.py and enable the logging application. Now build your customized Docker image and use it for deployment!

Happy testing!

This is the first publication in our customization series. It will show you how to override any template used by Kiwi TCMS. As an example we will override the email template that is used when registering new account. By default the email text looks like this:

    Welcome {{ user }},
    thank you for signing up for an {{ site_domain }} account!

    To activate your account, click this link:
    {{ confirm_url }}

https://public.tenant.kiwitcms.org runs a custom Docker image based on kiwitcms/kiwi. For this image the confirmation email looks like this

    Welcome {{ user }},
    thank you for signing up for our Kiwi TCMS demo!

    To activate your account, click this link:
    {{ confirm_url }}

    GDPR no longer allows us to automatically subscribe you to
    our newsletter. If you wish to keep in touch and receive emails
    with news and updates around Kiwi TCMS please subscribe at:
    https://kiwitcms.us17.list-manage.com/subscribe/post?u=9b57a21155a3b7c655ae8f922&id=c970a37581

    --
    Happy testing!
    The Kiwi TCMS team
    http://kiwitcms.org

The file that we want to override is tcms/templates/email/confirm_registration.txt.

Create a local directory (git repository) which will hold customization configuration and create a file named templates.d/email/confirm_registration.txt with your text!

Next you want to make this file available inside your docker image so your Dockerfile should look like this:

    FROM kiwitcms/kiwi

    COPY ./templates.d/ /venv/lib64/python3.6/site-packages/tcms/overridden_templates/
    COPY local_settings.py /venv/lib64/python3.6/site-packages/tcms/settings/

where local_settings.py contains

    import os
    from django.conf import settings

    settings.TEMPLATES[0]['DIRS'].insert(0, os.path.join(settings.TCMS_ROOT_PATH, 'overridden_templates'))

The following code states instruct Django to look into overridden_templates first and use any templates it finds there; also make my files available in that specific location inside the docker image.

This approach can be used for all templates that you wish to override. Take into account that file names must match (Django searches templates by directory path). Now build your customized Docker image and use that for deployment!

Happy testing!

When you start Kiwi TCMS by running docker-compose up (see here) it will automatically create 2 volumes: kiwi_db_data and kiwi_uploads. This blog post will outline how to backup these docker volumes.

Note: in the instructions below kiwi_db is the container name and kiwi is the database name used inside the docker-compose.yml file!

MariaDB/MySQL database

To export all contents from the docker container execute the command:

docker exec -i kiwi_db mysqldump --user <username> --password <password> kiwi > backup.sql

This will create a file named backup.sql in the current directory, outside of the running container!

You can restore the database contents by using the following command:

cat backup.sql | docker exec kiwi_db mysql --user <username> --password <password> -v kiwi

Notes:

  1. Depending on your scenario you may want to remove the existing volume (docker-compose down && docker volume rm kiwi_db_data) before restoring the database!

Postgres database

To export all contents from the docker container execute the command:

docker exec -i kiwi_db pg_dump -U <username> --dbname=kiwi -F c > backup.bak

This will create a file named backup.bak in the current directory, outside of the running container. This is a PostgreSQL custom database dump format which contains all data and schema definitions. That is a binary file which can be read with the pg_restore command!

To drop and restore the entire database execute:

docker exec -i kiwi_db psql -c "DROP DATABASE IF EXISTS kiwi;"
cat backup.bak | docker exec -i kiwi_db pg_restore -U <username> --dbname=template1 -vcC

Multi-tenant database

The kiwitcms-tenant add-on and/or Kiwi TCMS Enterprise work only on Postgres! Each tenant (aka name-space) uses a separate database schema. The first schema name is public.

The backup and restore instructions shown above operate on all tenants together! If you want to [drop and] restore an individual tenant then use the commands:

docker exec -it kiwi_db psql --dbname=kiwi

kiwi=> DROP SCHEMA $tenant_name CASCADE;
....
DROP SCHEMA
kiwi=> CREATE SCHEMA $tenant_name;
CREATE SCHEMA
kiwi=>Ctrl+D

cat backup.bak | docker exec -i kiwi_db pg_restore -U <username> --dbname=kiwi -v --schema $tenant_name

Backing up file uploads

Uploaded files can easily be backed up with:

docker exec -i kiwi_web /bin/tar -cP /Kiwi/uploads > uploads.tar

and then restored with:

cat uploads.tar | docker exec -i kiwi_web /bin/tar -x

You may also try the rsync command but be aware that it is not installed by default!

Note: the same approach may be used to backup /var/lib/mysql/ or /var/lib/pgsql/data from the kiwi_db container.

Backing up multi-tenant uploads

By default multi-tenant file uploads are stored under /Kiwi/uploads/tenant/$tenant_name. You can archive all contents with the same procedure above. If you wish to restore files per tenant you will have to upload the $tenant_name directory into the docker volume.

Alternatives

By default both docker volumes created for Kiwi TCMS use the local driver and are available under /var/lib/docker/volumes/<volume_name> on the host running your containers. You can try backing them up from there as well.

Another alternative is to use the docker-lvm-plugin and create these volumes as LVM2 block devices. Then use lvcreate -s command to create a snapshot volume. For more information see chapter 2.3.5. Snapshot Volumes from the LVM Administrator Guide for Red Hat Enterprise Linux 7.

Happy testing!

Page 1 / 1